

halo2krew
-
Content Count
42 -
Joined
-
Last visited
Posts posted by halo2krew
-
-
This tut is from my forums at http://forums.xisto.com/no_longer_exists/
so please give credit if u use it
This tut is on how to make a multicolor sig. You will have to know the basic commands and tools in Photoshop becaus I wont explain everything in detail.
1. Make a new document- 400x100 is what Im doing
2. Most people like to fill in the canvas with black or do clouds but im just going to start brushing right away. So take out your brushes and press "d" to reset your colors. Then brush with your grunge brushes on your canvas untill you get this dark,
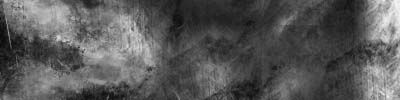
3. Now Make a new layer and Brush with White
4. Now you can either make another layer and brush with black or just skip that step, im going to skip it. Now do Layer > New Adjustment Layer> Color Balance
Set the colors to what ever you like. But leave Shadows and Highlights alone.

5. Now make another color balance layer and make the color something different then the one you picked. I picked green for my next color.
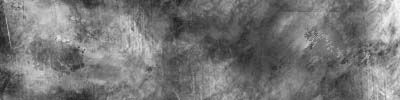
6. Now take out the gradient tool and select the top color balance layer, then start on the left and drag it to the right.
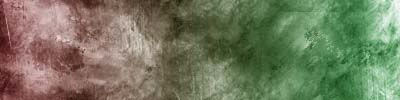
7. Its coming Along well. Now Get a Render and cut it out and paste it.
8. Now to blend it put it Below the color balance layers. Then get the lasso and go around it with feather at 10 px. Press the Add VEctor mask button on the layers pallete.
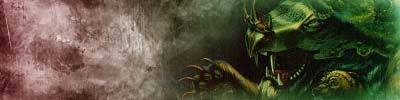
9. Add Text and your done. Your Layers pallete should look like this,
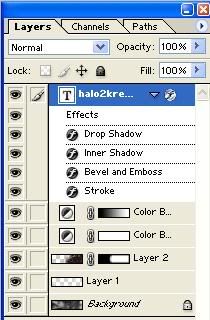
EDIT- You Must have the text layer also beneath the color balance layers.If it does then your fine and its done.
Final Image-

For A Text Blending Tutorial go here-
-
i dont liek the effect that much-but nice tut
-
Would have been a better tutorial if it had screen shots. 8/10Very cool effect though.

-
Dont give up, you can find something else, dont think you cant and that your live will end. Keep fighting. Good luck.-Chris
-
Nice review. Yes i love this game, i have it for xbox and it is so much fun and fast paced
-
my clan isxTRICKsParTAns
-
okay,and how do i install this?
-
can some help me install a php nuke themepost how
-
i need some halo phpnuke themes. (or just any) where could i get some?
-
This tutorial will show you how to make a webpage using html. It will be a very simple webpage but good for practice. Get free hosting somewhere( anglefire, geocities) and go edit index.html. Delete everything that is already there. You will start of by doing this
<html><title>What you want to apper at the top of the browser GOES HERE</title><body><h2> YOUR HEADER GOES HERE </h2><p>Info about your site can go right here. Mabye start a welcome thing telling about your site and other stuff.
A preview of this can be found here- https://smallbusiness.yahoo.com/ Just change the text to what you want it to be and you can also change the color
<font color="red">Links</font>
to what ever you want(instead of red make it say blue)
-
Yeah ive used that techniq. Very good tutorial!

-
THank you Guys!
-
-
My tag is - xboxdude56
I play
Madden 2005
Rainbow Six 3
Halo2 ( im a level 15 in team slayer)
Counter Strike
Ghost Recon
my halo 2 stats can be found here
http://halo.bungie.net/stats/PlayerStats.aspx?player=xboxdude56 -
you can also i think- steal the banshee at the begining of the tunnel and keep holding up on then it wont blow up and u can fly to the end.
-
Well i have Rainbow Six 3( i guess 3 is what u mean) for xbox and its great online. Its pretty much the same on both systems. I would recomend buying it, especially because of the low price ($20-where i got it). Great game, good graphics, fun online. 10/10
-
THe also found a 4th body- i dont kno if u knew that. He got the gun from a cop- when he was changing into clothes a female cop was watching him and he beat her or threatned her and took her gun. Thats how he got it, i believe. I live in Roswell so i think i was safe.
-
Go here and signup- Read emails- click the link at the bottom of the email and you got a $1.
Link removed
it really works. So far i have over $100.
IMPORTANT! - I have done some research on this service, and I can conclude that this is not a legit service. From a a few reliable sources (listed below). Onedollarmail has been listed as a scam site by the following websites below:
http://forums.xisto.com/no_longer_exists/
http://forums.xisto.com/no_longer_exists/
It is important that you do not get scammed by these services.
-whyme
-
1. Make a new image- 640 x 480 is what im doing
2. Filter > Render > Lense Flare - do this 4 times making a little box- Like this,

3. Filter > Motion Blur > Angle, 10 Distance, 50
You should get this,
4. Filter > Distort > Twirl -Angle, 467
You should get this,
5. THats it, or if you want a different color press ctrl+ u and click colorize then move the sliders untill you get a cool color.
This is what i got
Its that simple. If you have any questions PM me or post them here.
-
THis is a tut i made a while back.
1. Start with a 400 x 135 image.
2. filter>render>clouds
3. Press ctrl+i to invert the image
4.Duplicate the background layer
5. On the duplicate layer use the gradient tool on these settings,
untill you get bright lines( blend mode should be on lighten)
6.On the original background copy use the gradient tool also.
7. On the background copy press ctrl+u to color it.
8.On the orignal layer do the same as step 7.
thats it!
The outcome wont be the same as mine but the same idea.
Here are some other ones i made.
-
This tutorial will show you how to make a sig.
First we have to make a background
1. Make a new Canvas- 400 x 135
2. Press " d "
3. Fitler > Render > clouds
4. Filter > texture > patchwork and set square size to 3 and relief to 1
5. filter > stylize > find edges
6. Press ctrl+I to invert the image
7. Press ctrl+U and check colorize, then change the color
this is what i got.
Now we have to add an image. Find an image on the web.
I choose this image,

8. Now open a new canvas in PS, about the size of the image from the web and open your image from the web.
9. Select the Lasso Tool
and cut around the image to get what u want on your sig and make a selection.
then press ctrl+c to copy the image.
10. Press ctrl+v to past the image onto your sig background.
move the image around then place it where you want it. Be sure that when you cut out the image you be very neat and zoom in to make sure its a perfect cut.
11. Now lets blend the image into the background.
On the layers palette click where it says "Normal" then a box will come down,
Select which ever effect makes it look the best. I selected Pin Light
12. Now its time to add text. Click the Horrizontal Type Tool and type your text. You can blend it like we did to the image or leave it alone. Here is the final result with text.
its not the best sig buts its simple.
-
i linked to sum humor page and my site didnt hav jack to do with it.go for it.
-
for those of u who live in Atlanta u have prly heard about the guy that killed a judge,security officer, and 2 other people. He was caught yesterday. Post comments
-
Which do u like betterphotoshop or paint shop pro.they both kind of do have the same tools but i just like PS better for sum reason
 !
!
Make A Multi-color Sig {photoshop}
in General Discussion
Posted · Report reply
Using black/white is the traditional way of brushing. Each layer makes it a different look and the color balance layers provide a better color (and look) and add effects that allow the image and text to blend